
Rustic DIY Woven Bench Transformation
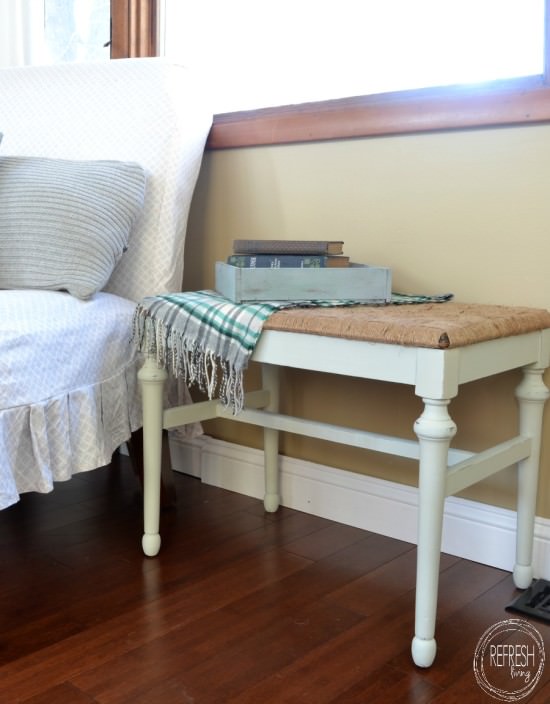

I found this bench at an estate sale for $5. The problem with it was clear – the cane seat was completely destroyed and it no longer was a functional bench. I saw this rustic woven foot stool at Anderson and Grant a few months back and absolutely loved it. I knew as soon as I saw it that I needed to find a piece to makeover with this technique.
This month for the Create and Share Challenge hosted by Stephanie from Casa Watkins we were supplied with paint, wax, and brushes from Wise Owl Chalk Style Paint to complete our projects. My nonfunctional bench seemed to be the perfect candidate for the woven seat and I knew chalk paint would give it the perfect rustic look I was going for.
This bench top was just screwed on with ten screws, so I was able to easily unscrew the top.
I started by prepping the frame of the bench. Although I used chalk paint for this piece, I always do a couple of things before painting anything, with any type of paint. Here are all my tricks for prepping furniture. After prepping, I painted the frame in Sea Salt. It’s a light color, so I needed to paint three coats. Overall, I really enjoyed using this paint. It’s comparable to the other types of chalk paint I’ve used, and gives a nice, matte finish.
Before applying the wax, I lightly sanded the piece with 220 grit sandpaper, applying extra pressure to corners and edges to reveal some of the wood.
To create the weave on the top of the bench, I used jute twine. I found this at Hobby Lobby and ended up needing almost 4 rolls of it. Halfway through the weaving, I did figure out a trick that could have saved me a lot of twine, which I’ll share with you in a bit.
I tightly wrapped the twine around the bench top across the whole bench. I debated whether I should just staple every two ends of twine, but I thought this was would be a lot sturdier. In the end, I’m glad I used the extra twine to wrap all the way around the frame.
Whenever I ran out of one roll of twine, I simply tied a knot to the next piece and kept wrapping.
To achieve the weave, I used a paint stick to get the pattern started. Because I was weaving across a fairly long surface, I used a drawstring threader as my extra long needle. Both of these ended up being huge time savers.
After finishing a band of weave, I removed the paint stick, threaded it through the opposite way, and then continued weaving each thread one by one.
At first, I just wrapped the twine all the way along the back to then start the next row. Halfway through, I realized that the first wrapping I did was sturdy, and I could use those strings as a way to reverse the twine. So, instead of going all the way across the bottom, I looped the twine around one of the bottom pieces, and then was ready to start the next row. I did this for a couple of rows, and then would wrap one all the way around just to keep it sturdy.
I debated stapling all of the pieces on the back, but because this is a bench, I worried that the staples might give out, or just not give as secure of a seat. I know that this method is extremely sturdy, but it did use a lot of twine!
I will admit, the weaving portion of this rustic DIY woven bench transformation was pretty time consuming. Luckily, Wise Owl Chalk Paint is easy to use and dries quickly, so the painting portion was a breeze!
Check out all of the other amazing projects completed with Wise Owl Paint!

A Shade of Teal ~ Night Stand Makeover
Old House To A New Home ~ Chalk Painted Accent Table
Pocketful of Posies ~ Old Door Dining Table
Domicile 37 ~ Faux Marble Top
Refashionably Late ~ Dining Room Re Do
Knock It Off Kim ~ Aging Furniture With Chalk Paint
Refresh Living ~ Rustic DIY Woven Bench Transformation
The Twin Cedars ~ Chalk Paint Furniture Flip
Our House Now A Home ~ Wall Paper Organizer
Lehman Lane ~ Cedar Chest Makeover
Green With Decor ~ Old Cabinet Drawer Makeover
One Mile Home Style ~ Drab to Fab Table Makeover
The Weathered Fox ~ Charging Station
Casa Watkins ~ DIY Aztec Art
Post by Jenny Leads
Jenny is the voice behind Refresh Living. She has a passion for helping people to create a home they love without spending a lot of money.
This is gorgeous, Jenny! I remember the project you’re referring to from Anderson & Grant and I absolutely love both of them.
Oh, thanks Amy! I was so glad I found a piece that it would work on.
I love that stool from Anderson Grant too and your look amazing Jenny! One of these day’s I am going to have to do a knock off too! Thanks for sharing! Pinning!
Thanks, Cat! It was a fun one (although a little tedious)!
Jenny this bench is stunning! I love love love the transformation. I’ve been looking for a similar style forever! Now I know not to pass up a bench that has some of the weave missing. This is totally dreaming. Great job, CoCo
Oh, thanks so much, CoCo! This one was such a fun update.
Love it! Sea salt is such a beachy gorgeous color! The color seems to change throughout the day with different lighting! Is it blue, is it green… is it gray… its so lovely! Great job on reinventing this piece and giving it so much curb appeal!
You’re totally right about the changes in color! Thanks for coming to visit.
Wow, great makeover
Thanks, Lee Ann!
Absolutely stunning transformation, I will definitely need to try this technique, looks fabulous!!
Thanks, Evija! I’m glad you like it!
Beautiful job Jenny! The paint color is perfect and that woven top looks amazing!
Oh, thanks so much, Stephanie!
Wow, I can’t believe you did all that by hand. It turned out amazing! I wish I had more patience because this turned out great.
Thanks Katy. It definitely was time consuming, but once I figured out the tricks, it went much faster!
I love this look and I can’t wait to try the jute weave on a bench. Perfectly rustic, beachy but feminine. Beautiful job!
Oh, thanks so much Meghan!
Beautiful transformation of this bench!
Thanks, Mary! I’m SO glad you like it – I love your work, so it means a lot. 🙂
The bench turned out gorgeous. It was so worth all of the painstaking work you went through to get it done. Thanks so much for sharing at Friday’s Furniture Fix! ;o)
Thanks, Lucy! It really wasn’t as bad as it looked. (Now I can say that since I’m done with it!)
SO, you don’t say, but you did have to remove the top completely to do the wrapping and weaving. How would this equate to using on a chair seat? I little more info would really be appreciated. Thanks!
Yes, I removed the top of the bench to weave it, but you could also staple every two loops on the bottom (it’d just be a lot of stapling!) and the top wouldn’t need to be removed. So for a chair, it’d really depend on the type of chair. I have some that the inner seat panel can be removed and then you could weave on top of it. For some of the cane chairs that are missing the cane, they have holes drilled around the circumference of the chair, and you could do a looser weaver through the holes. I actually plan to do this a couple of chairs in my garage, so I’ll be sure to post about it, because sometimes my ideas change when I actually get my hands on it!
Thanks so much for getting back on this one…I have two chairs that I don’t think I can afford to have re-caned by an expert. Thought the Jute would be an excellent idea.
This is amazing! I would have never thought of weaving jut for the top of a stool! It’s awesome and I love it! Your whole project turned out great!
Thanks, Ruthie!
AMAZING Jenny! I can’t believe you did the weave too. Love the results. Absolutely amazing. pinning!
Thanks so much for your kind words, for sharing, AND for putting together this challenge!
Great tutorial! There are a lot of these chairs at a local auction house. Next time I will pick up a couple and try this method.
Jenny, I love the woven twine! Thank you for the tips on how you did this. Pinning and tweeting to share. We love that you came over to share your project with us at Brag About It! Look for your feature at next weeks party!
~Laurie
Thanks so much for sharing, Laurie!
Jenny, this bench us awesome!!! Nice job!! All the twine and time that took to make this is definitely worth it!! It looks incredible!!
Oh, thanks so much Keri!
This is amazing! The time and effort you put into fixing it is definitely worth it! I absolutely love saving old pieces and think you did a fantastic job!
Amaazing transformation, Jenny! A true labor of love. 🙂
I love your bench and the creative way you used the jute twine. Fabulous! Featuring tonight at Talk of the Town. Thanks so much for sharing:-)
Great, Betsy! I’m so glad to hear that you like it. Thank you!
Good Morning!! I wanted to let you know that your post has been selected as a Feature for the Welcome Home Wednesdays Link Party! Stop by this morning to see your post linked up and grab your Featured Button too! 🙂
Thanks so much for selecting it as a feature!