
DIY Spice Rack with Test Tubes

I take absolutely no credit for this DIY spice rack. This is my sister’s brainchild and creation, and I’m just here to show it off.
A couple of days before Christmas I went over to her house and saw copper end caps, test tubes, and a sketch on the table. As soon as I saw her plans for a DIY spice rack that she was making for her boyfriend, I made her promise to take process pictures as she worked on it. She followed through, and also created a creative and beautiful place to hold spices.
Here are all the steps you need to know to make your own – photographed by my sister and told with my DIY tutorial.
Like any good builder, she started with plans, very detailed plans, I might add. This is one area in which we function differently. She loves to sketch out ideas and put them on paper, while I just let mine float around in my head and then try to recreate them, sometimes with a little too much haste.
For the wood, she used a piece of butcher block and cut it down into two equal pieces. I’m guessing my dad used a hand saw, but I don’t have that steady of a hand, so I probably would have used my table saw. Either one works fine. His saw actually burned some of the edges, but rather than sanding it off, my sister left it because she liked the look. I like it, too!
When my sister was explaining this project to my dad, she asked if he had any wood that might work. Of course, he had a leftover piece of two inch butcher block lying around his garage. Beautiful.
His garage, however, is far from beautiful, although it does usually contain anything you might need. Every time I go in there, I snag something else to use for a project. He doesn’t even know it goes missing, pretty much because his four-car garage looks something like this.
Now imagine that space 20 times over and over again. You can see why I always leave with something weird. And why only one car actually fits in it right now.
She figured out the correct spacing well before drilling into any piece of wood and marked it on the top piece of wood. I hate to admit that I’m jealous of her planning here. I probably would have “eye-balled” it, and messed up a little along the way.
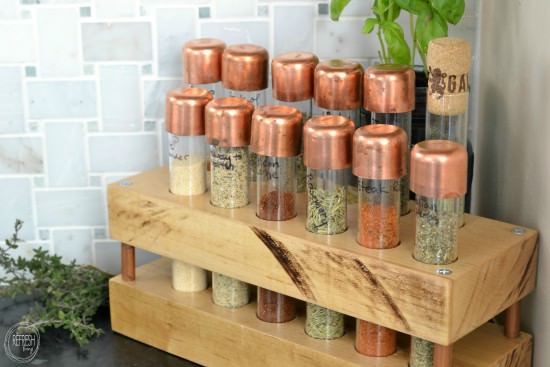
She planned out one-inch holes based on the test tubes she bought for the project. She used 25 mm (diameter) by 6 inches tall test tubes from a science supply store. But you can also find this size on Amazon![]() , just like most anything else you might want. The 25 mm size allows you to store a lot of spices, and gives surprisingly good control when sprinkling them. The one-inch copper end caps fit on the 25 mm tubes. I’ve also seen many people make spice racks with the 20 mm size. Wine corks fit in this size test tube, and you might be able to get away with 3/4″ copper end caps as tops. The verdict – the perfect size test tubes for a spice rack is up to you, but I wouldn’t go smaller than 20 mm.
, just like most anything else you might want. The 25 mm size allows you to store a lot of spices, and gives surprisingly good control when sprinkling them. The one-inch copper end caps fit on the 25 mm tubes. I’ve also seen many people make spice racks with the 20 mm size. Wine corks fit in this size test tube, and you might be able to get away with 3/4″ copper end caps as tops. The verdict – the perfect size test tubes for a spice rack is up to you, but I wouldn’t go smaller than 20 mm.
Okay, back to making the actual rack. They drilled four holes in the corners that will later be used for the screws to pass through.
Once she had the holes marked for the test tubes, my dad used his drill press with a spade bit to make the holes in the top block. Not all of us have a garage like my dad, so a hand drill with a one-inch spade bit will also work just fine.
After the top block holes were drilled, he set that block on top of the bottom block and used it as a template to drill the holes in the bottom piece. The bottom piece serves as a resting place for the test tubes, so you only want to drill about halfway through the wood on the first row.
The bottom piece serves as a resting place for the test tubes, so you only want to drill about halfway through the wood on the first row. To achieve the two-tiered look, you’ll leave the back row solid, so the test tubes sit higher up that the front row.
A coat of polyurethane on the blocks will help it to withstand kitchen grime.
After everything was dry, they cut down four pieces of copper pipe with a Copper Pipe Cutter![]() and placed them between the blocks as a spacer, and so the screws wouldn’t be seen.
and placed them between the blocks as a spacer, and so the screws wouldn’t be seen.
They used very long screws (length depends on how thick your pieces are and the amount of space you want between the blocks) to go all the way through the top block, through the entire space between, and about halfway into the bottom block.
For the tops, she used one-inch copper end caps. Then, she cut out circles in thin cork and hot glued each circle to the inside of the cap.
I love this spice rack and I’m a little jealous I don’t get to keep it in my kitchen!
Feel free to pin it!
A few other posts you might enjoy:
Post by Jenny Leads
Jenny is the voice behind Refresh Living. She has a passion for helping people to create a home they love without spending a lot of money.
Love this project- I love copper and wood together, the color contrast is indescribable. This spice rack looks so clean on your counter top – well done!
I just love the copper and wood contrast, too. Thanks!
What a creative idea! It looks fantastic! I’d love for you to share this at our weekly link party. http://www.thelifeofjenniferdawn.com/2016/01/6-amazing-sewing-projects-to-try-today.html Hope to see you there!
Thanks for stopping by, Jennifer. I just linked up!
SO awesome!!! My science teacher mom would adore this. Love it! Talent runs in your family!
Oh, yes, I bet she would!! Thanks, Bre!
Hi there, visiting from Posed Perfection. LOVE the herb test tubes! Blessings, Cecilia
Thanks so much for stopping by! I’m glad you like it. 🙂
Oh my goodness, amazing!! I really want one now.
Thanks! I really want to keep this one, too. Now, I might just need to make my own!
This is such a cute and great idea!
Thanks, Emily!!
I just can’t get over how creative this is, and the copper tops were a perfect choice! I just wanted to pop back over here again to let you know that this is being featured at our weekly link party. http://www.thelifeofjenniferdawn.com/2016/01/diy-projects-for-home-and-little-bird.html
Thanks so much for featuring it – I appreciate it!
Oh my gosh, I’m OBSESSED with this! Your sister did a great, great job. Thanks so much for sharing at Merry Monday, you’re going to be my feature this week! I’ll be sharing on all my social media on Sunday so I’d love it if you’d follow me! Hope to see you again for next week’s party!
Great! Thanks so much for choosing it as your feature. Have a great one!
Hi!! I just wanted to stop by and let you know that your post has been selected as a Featured post for the Welcome Home Wednesdays Link Party!! Stop by and see your post linked up and don’t forget to grab your “Featured” button too!! ~Lisa~
Awesome! Thanks so much, Lisa!
So professional I was ready to order it. This is what happens when no dad or his great garage with tools available. I do not have wall space for a spice rack and really no counter space but this compact but very full piece could be hung on a wall space I could find room for.
Thanks for the kind words, Jody! I have seen some similar ones that are mounted on the wall. There are a couple of Etsy sellers that I know make them – I’m not sure of how much or how big, but it might be worth taking a look!
So unbelievably obsessed with this! I cannot wait to show my husband and force him to make me this!
I’m so glad you like it! I hope he agrees with your request!
I love this idea – so clever!
This is a very cool project!!
I love how detailed her plans are, and those copper tops look great with the wood! Stopping by from Pink Heels Pink Truck link party!
This looks like a really cool project. Thanks for sharing
This is so unique!! I love it – great idea. Thanks for sharing with us on the family joy blog link Party 🙂
>> Christene
Keys to Inspiration
Such a clever way to store spices. Thanks for joining us at the Inspiration Spotlight party. Pinned & shared.
Jenny!! You know me and my love of copper! This project is amazing! I’ll be pinning for sure!! Thank you for sharing at the Creative Gallery!
This is too cute! Love that you and your dad totally DIY’d the whole spice rack! It rocks! Thanks for sharing it with Funtastic Friday!
Superb blog post! This blog clearly explains the concept and the information are very useful. I thank for sharing this wonderful content.