
DIY Wall Mounted Bookshelves
We have a lot of books in our home, a lot. I don’t think I can ever say we have too many books, especially considering I am certified as a reading specialist and a teacher of literacy, but I can say we have so many books we just don’t have room for them all.
 Before, I had a bookshelf in my girls’ room that was overflowing with books. (And it only houses about 1/3 of the children’s books in our home!) There just wasn’t enough space for everything, and as a result, my girls didn’t always return their books to that cluttered bookshelf. I was much easier to just throw the books in a pile on the floor than try to jam them in an open slot.
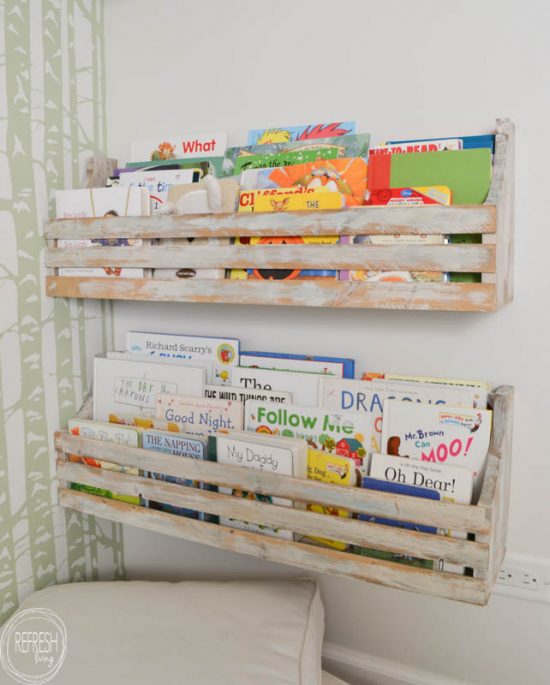
I knew this was an area that needed to be revamped as I finished my girls’ shared bedroom space. These wall mounted bookshelves were the perfect solution.
Ryobi Tools graciously sponsored this post, yet all descriptions and opinions are my own.
Supplies Needed to Build the Bookshelves
- 1″ x 8″ x 8′ pine boards (I used one 8 foot board for each shelf, but depending on how long your bookshelf is, you may need more or less)
- lath strips or you could also use 1″ x 2″ boards
- Ryobi Airstrike nailer
- Ryobi sliding compound miter saw
- Ryobi cordess jigsaw
- paint or stain
- electric sander or sanding block
First, I cut down the boards to the length and height I wanted my bookshelves. This is totally your preference based on the size you’d like to make your bookshelf. I used my sliding miter saw for this, and it made the job so much easier! I’ve used a regular compound miter saw for awhile now, so switching to a sliding miter saw makes me appreciate it that much more. You can easily cut wide boards all the way through which makes these jobs so much faster and easier.
On the edge pieces, I used a bowl to trace an arc and then used the jigsaw to cut out the shape.
To assemble the bookshelf, I used a Kreg Jig to drill pilot holes into the back of the back piece, and then screwed the back to the bottom board, using wood glue on the joint. You could also screw pilot holes and screws up through the bottom board and into the back board instead.
To attached the sides, I used my Ryobi Airstrike to nail them to the bottom and back boards. I can’t tell you how awesome this tool is; it’s literally freeing! Having used airnailers for many years and always being frustrated with having to use an air compressor with it, this tool takes all that frustration away. Attach the Ryobi One battery and you’re ready to rock and roll.
I chose to paint the bookshelves at this point, because I knew it would be a lot more difficult once the front boards were installed. I gave the boards a barn wood appearance with a paint and stain technique.
My airless nailer came in handy again for attaching the front boards, and then it was time to install them in the room.
To do so, I first found the studs in my wall. After knocking on walls for quite a few years and miscalculating the location of studs far too many times, I spent a couple of bucks on this stud finder, and it has made my DIY life so much easier!
Once the studs were located, I made a mark on the bookshelves corresponding to where the studs were in the wall, and then drilled a pilot hole in those places. (Pilot holes ensure the wood won’t split when you drill the screw into the wood.)
Each bookshelf was attached in three places with a screw, and then it was time to fill them with books!
My girls love their new bookshelves! My four-year-old commented how nice it was that she could see all of her books now. I can tell she enjoys picking out her books even more now.
An added bonus to these bookshelves – it’s almost as if my girls actually enjoy putting their books away in them. (We’ll see how long that enthusiasm lasts…)
This project was part of a complete room overhaul where I took a small bedroom and transformed it into a shared bedroom space for my two girls. You can see the entire room here – complete with a lofted bed!
Like what you see? I’d love for you to follow along!
Facebook || Pinterest || Instagram || Google + || Bloglovin’
Post by Jenny Leads
Jenny is the voice behind Refresh Living. She has a passion for helping people to create a home they love without spending a lot of money.
great project and love that the kids can see the book titles, thanks for sharing on craft schooling Sunday!
Can you explain more on how you did the weathered paint technique? I love these by the way!!
Hi Emily. I’m sorry for the delay in responding to your comment. I basically used a dry brush technique. Dip just the tip of the brush in the paint, dab off the paint on a towel, and then lightly brush the paint over the surface in quick motions. I used a couple of different colors to get the affect you see on these bookshelves (I think it was a white, gray, and light turquoise, if I’m remembering correctly.) Happy creating!